I currently have a new (rudimentary) version of the Shoppe up. This time it's on Blogger which should make it easier to manage, and keeps a fairly consistent look. If anyone has any comments, suggestions or ideas please feel free to let me know.
http://s-o-mshoppe.blogspot.com/

Tuesday, December 16, 2008
Cocktail Creations
I'm putting together a 19th birthday gift for a friend of mine and I decided to make up some nice recipe cards with different drink recipes to give it some extra detail. After looking at several other designs at my favorite place for inspiration - Scrapgirls (♥) I decided to just wing it. It started out as a clean, elegant design and then morphed into a more urban hip-feel with Polaroids and masking tape. Here's the end result with the list of supplies. And no, I did not take the photo's I googled them.


Paper - ScrapChicStudio_OnTheMoveFreebie_Paper1.jpg
Tape - Masking Tape (available in the shoppe)
Clip - ScrapChicStudio_OnTheMoveFreebie_BinderClip.png
Polaroid - Polaroid (available in the shoppe)
Brush - Urban_Scrawl_by_InvisibleSnow.abr (twofish.psd)
Font - Freestyle Script
Tape - Masking Tape (available in the shoppe)
Clip - ScrapChicStudio_OnTheMoveFreebie_BinderClip.png
Polaroid - Polaroid (available in the shoppe)
Brush - Urban_Scrawl_by_InvisibleSnow.abr (twofish.psd)
Font - Freestyle Script
Tuesday, December 9, 2008

Wednesday, October 29, 2008
Shoppe Issues
So, immediately after my last post, I went to go and upload the new alpha set, only to find the the site I had been using to upload my files, is gone. I already have a new site and I am in the process of re-uploading everything from shop. It should be up and running again in a day or two. My apologies for any inconvenience this may cause.
Shoppe Update
Halloween's coming and for some of you, so is Thanksgiving, and the best way to get in the spirit is by designing some new supplies!
So for your enjoyment, I present the Pumpkin Spice alpha set. This set would look great for place cards at your Thanksgiving table or in a beautiful fall layout. I hope you enjoy.
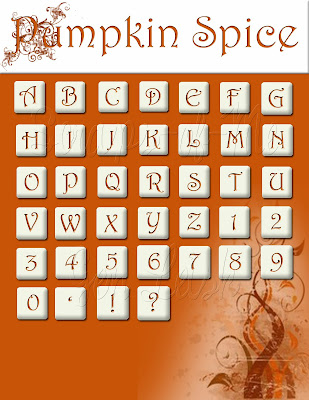
Happy Scrapping! ♥
P.S I've added a little something special as well. Trick or Treat? You'll have to find out...
So for your enjoyment, I present the Pumpkin Spice alpha set. This set would look great for place cards at your Thanksgiving table or in a beautiful fall layout. I hope you enjoy.

Happy Scrapping! ♥
P.S I've added a little something special as well. Trick or Treat? You'll have to find out...
Tuesday, October 28, 2008
Tuesday Tutorial - Refrigerator Chic
It's been a long time. Too long really, but now, I proudly announce the return of
*drum roll*
The Tuesday Tutorial!
Some of my favorite layouts are made to look like something other than a scrapbook page. It could be a page out of a notebook, or a photo on the fridge. In order to do this I have often had to create some of the elements myself. Not because it doesn't exist out there, but usually because I was to impatient to search for it, or to cheap to purchase it. One of the easiest and most versatile is the magnet.
What You'll Need:
Photoshop
Small item that could be made into a magnet (optional)
Tools Used:
Drop Shadow
Bevel/Emboss
Text
Please keep your hands and arms inside the vehicle at all times...
by rotating the 'magnets' slightly, you can get a slightly haphazard
*drum roll*
The Tuesday Tutorial!
Some of my favorite layouts are made to look like something other than a scrapbook page. It could be a page out of a notebook, or a photo on the fridge. In order to do this I have often had to create some of the elements myself. Not because it doesn't exist out there, but usually because I was to impatient to search for it, or to cheap to purchase it. One of the easiest and most versatile is the magnet.
What You'll Need:
Photoshop
Small item that could be made into a magnet (optional)
Tools Used:
Drop Shadow
Bevel/Emboss
Text
Please keep your hands and arms inside the vehicle at all times...
- Open a new image in Photoshop. Any size you want. I'm going to be using a 12"x12"(864 pixels x 864 pixels) image because that is the size I use for my layouts.

- Take the text tool and type the letters A, B and C with each letter on it's own layer. Blocky, basic fonts work best if you're going for the classic Alphabet Magnet look. I'm using Turkey Sandwich which can be found here. I will post a list of suggested fonts as well.
- Now colour your letters. I'm using the primary colours, because once again it lends a very basic Alphabet Magnet feel to it. (DB0808, 192BD7, EFFC27). Highlight the text you want to colour and double click on the coloured box in your text toolbar (across the top) to bring up your colour picker.

- Next you want to add a drop shadow add layer style (select the stylized f from the bottom of your layers pallette)>drop shadow and the bevel and emboss effect add layer style>bevel and emboss. Tick the box for contour under Bevel and Emboss on the left of the add layer style window.


- Repeat step 4 with the other two layers and there you have it. Alphabet Magnets.
- If you want to make magnets out of an object, simply open the image, and do step 4 on it. Feel free to play around with the drop shadow and Bevel and Emboss effect untill your magnet is to your liking.


by rotating the 'magnets' slightly, you can get a slightly haphazard

Thursday, April 3, 2008
A Budding Scrapper
At (almost) 19, I am the oldest of three sisters aged 10, 16 (as of yesterday!) and 15. Recently the youngest - Zoe - has shown an interest in what I "do all day". So I've been showing her somethings on Photoshop and having her test run the tutorials as someone with no experiece to ensure they can be followed. She's getting pretty good and it's making me proud ( :) ). Yesterday we went over brushes and she made some things so I'm going to collect them all up and make them into a pack so stay tuned for the very latest from this up and coming scrapper!
Happy Scrapping ♥
Happy Scrapping ♥
Wednesday, April 2, 2008
J/K
So yes, the last post was a joke. I will not be abandoning this blog for any reason and if I were to, I would most definitely not be blogging bout cleaning supplies.
April Fools ♥
April Fools ♥
Tuesday, April 1, 2008
Mr Clean to take over Scraps-of-Me
Due to lack of interest, I have decided to take down this blog and replace it with one dedicated to household cleaning supplies. This new blog will feature reviews, deals and tips on how to make your cleaners clean more! I am very excited about this and I know you all are to.
Stay Sanitary ♥
Stay Sanitary ♥
Monday, March 31, 2008
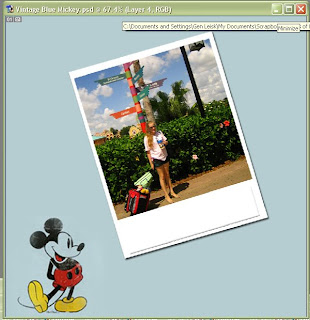
Hey guys!
I've been doing some creating lately and it appears I have Disney fever! I recently bought eight and a half HOURS worth of Disney music and I'm also writing a Disney themed story. So here are the results of my condition and check out my other blog "A Case Of The Mouse" if you get a chance.


And of course, it's all available in the shoppe
Tuesday, March 25, 2008
Spring
Yesterday: Birds sang, there was dry ground to be seen and I walked home at 5:00 in full sunlight. Spring was finally on its way. The today it began to snow. And it hasn't stopped. Huge flakes the size of feathers that in December would have been beautiful and had me humming "Winter Wonderland" instead had me searching desperately for the brightest most springy paper I could find. I settled on a beautiful green one, added flowers and butterflies and voila! A springy tribute to a great friend. Anything can be inspiration. I wish you all lots of April showers and May flowers and as always,
Happy Scrapping ♥
Happy Scrapping ♥

Tuesday Tutorial - Organizing
Today's tutorial is accutally something a little more practical rather than creative. I spent the long weekend organizing my supplies as I have so many now that I crash my computer if I try to open some of the folders.
What You'll Need:
Blank CD's/DVD's (preferably rewritable)
OR
Several USB keys
Your supplies
A burner
On your computer:
Happy Scrapping ♥
What You'll Need:
Blank CD's/DVD's (preferably rewritable)
OR
Several USB keys
Your supplies
A burner
On your computer:
- Set up a separate folder to keep your supplies, ideas and completed LO's in. I named my Scrapbook
- Within this folder set up 3 new folders Layouts, Supplies, and Zipped. I also have a folder called Miscellaneous where I keep copyright info, contact sheets and other misc. files related to my scrapbooking.
Layouts: This folder is where you will save all of your finished Layouts. Within this I also have a folder for inspiration (LO's by others for ideas and inspiration) and one called gallery thumbs where I put all the shrunk images for uploading to the Scrapgirls Gallery.
Supplies: This is where you will keep all your supplies. More on that later.
Zipped: Often when you download scrapbooking supplies or any kind of large file, it will come "zipped". All you need to get at the files inside is a program like Winzip. I use Just Unzip It. Whichever program you use you ought to be able to right click on your downloaded zipped file and click extract or unzip. This folder is where I keep all of those left over Zipped folders once I've extracted from them, just in case something goes wrong and I need to do it again. When zipped the files take up less space than unzipped so you can probably fit many in here. - In the Supplies folder you're going to want to divvy up your supplies to make them easier to find. I have mine separated into Alphabets, Brushes, Embellishments and Papers. You may also want an extra folder for Tools of Add-Ons if you gather enough of them. For now I just keep those things in the main Scrapbook folder as I don't have many yet.
Inside the Embellishments folder I have things further broken down (because I'm anal like that). So I have Frames and Tags; Ribbons and Edging; Buttons, Brads and Fasteners etc. - Some people organize their papers folder by colours or themes, but as many of mine are multi-coloured I find it easier to just leave them alphabetically.
Happy Scrapping ♥
Monday, March 17, 2008

What is it about women and shoes? Now Im not being stereotypical. I believe all (ok not every single on, but enough) women like shoes more than other articles of clothing. Whatever form they may be. Whether you're like my friend who loves running shoes and converse (are they running shoes?) or me with a small wardrobe of shoes in my locker so I don't have to wear Canadian Winter Proof boots all winter, us females have an attraction to shoes. I love looking at them, comparing them, shopping for them and wearing them. Have you ever spent more money on the shoes for an outfit than the rest? Do you have more awesome looking sneakers than warm weather days to wear them? Maybe not, but everyone has something. My favorite pair? The Orange ones pictured above. I got them for $7 at Suzy Shier and the only pair happened to be my size. I have yet to wear them out anywhere but I got them out when my friends came home for Christmas and everyone had fun trying them on.
Happy Scrapping ♥
Hey! A tutorial!
Look! Its a new tutorial! Woohoo!
[Monday] Tutorial: The "Poloroid Effect"
So today boys and girls we're gonna learn how to make your photo's look like old school photo's. Sound like fun? Well I thought so.
What You'll Need:
Photoshop
Picture(s)
Tools Used:
Square Marquee Tool
Fill Tool (paintbucket)
Allrighty then, pens and paper ready?
- Open a new image. Mines going to be 12x12 because thats what I use for scrapbooking. I'm also going to use a paper to so I can see what Im working on better.

- Open the photo you want to work with and drag it onto your new document. I'm going to use the is picture from Coronado Springs resort in Disney World.

- I usually turn my photo so it's on a bit of an angle because it gives it a natural careless look that I think looks really good. You can do this by hovering over one of the photo's corners until you see a curved arrow with two heads. Once you see that you can click and drag your photo in the direction you want to turn it.
- Next go to your layers pallet and ctrl+click on your photo. This will produce a marquee around the photo, saving you a lot of trouble.

- Without deselecting, create a new layer (ctrl+n or file>new layer). This new layer should be the exact size and position of your photo.
- Now make click on the new layer in your layer pallet, but make sure you keep the original selected. Next get you fill tool (the paint bucket in your tools panel) and fill your selection with white (colour code ffffff).

- On the layers pallet drag the new layer down so it is listed below the original, this should put it underneath that layer.

- Now you need to drag the edges of your new white layer out to give your photo a border. Don't make it too wide, just a small one will do. It's not going to be perfect and will probably take some adjusting until you get a look that works for you.

- Now add a drop shadow and your photo is complete!


- you'll need to add a wider border at the bottom. Often this looks odd with longer or wide photo's, so if you want this look you may need to do some trimming like I did here. Ultimately you want your photo to be a little more square.

- Next add a smaller rectangle to the white space you now have at the base of your photo. Use a different colour while positioning it so you can see it better, you can change this later. Place the rectangle in the centre of the white space.

- Add a soft bevel layer>layer style>bevel emboss (Style: inner bevel; Technique: Smooth; Depth: 31; Direction: Up; Size:5)
- Fill this smaller rectangle in with white and add a drop shadow


Monday, February 4, 2008
Update, News and Changes
First off I want to apologize for the lack of tutorials in recent weeks. School has gotten really crazy, which is an excuse I would only like to use once, but it's the truth. So, I have decided that I will not be doing regular weekly tutorials until things smooth out a bit. If I happen to have the time I will definitely do one, but not every Tuesday.
Second - I have decided that this blog needs more substance. So, I have decided that as scrapping is a way of life - and a large part of mine - I am going to be posting more stuff about my life in general. Many times I'll even have an LO to accompany the post, so everything will still relate.
And finally, I have made some more stuff for the shoppe so head over and check it out. Nothing like the smell of free supplies to start your week.
Happy Scrapping ♥
Friday, February 1, 2008
Customized Google
I'm sure you all know the you can now customize your google homepage to the nth degree with a google account. Now though there is this great new site - Groovle, which lets you add your own picture to a google search page. It's not iGoogle so it wont have all the fancy applications and add ons, but if you just want a search engine it's fun. All you do is upload a picture, select the format you want (stretch, tiled or framed) and if you want to make it your homepage enter your email so they can send you the URL. They also have some pre-made ones to choose from but as digi-scrappers I'm sure you can all do a better job.
I'd be interested to see any LO's you might create specifically for Groovle.
Happy Scrapping ♥
I'd be interested to see any LO's you might create specifically for Groovle.
Happy Scrapping ♥
Friday, January 18, 2008
Caffeine for the soul

The strangest thing happened to me today and I am not sure how to describe it, it was almost like an epiphany. It was nearing the end of the day and I was feeling icky. I thought I looked bad, I was feeling run down and I really could think of nothing to look forward too. And to make matters worse I began to feel overheated while in the Tim Horton's line. I mean really overheated! It was overall just a bad scene.
However I began to feel better almost as soon as I got out of line, and I realised I didn't want to take the bus today. So I set out across the parking lot and all of a sudden this feeling came over me, I felt wonderful. Flashdance flooding through my busted MP3 phone, a Iced Cap in -20 degree* weather on the half-hour walk home, I had never felt more alive. I wanted to dance and I had a new bounce in my step. I was confident and happy, no excited with what lay ahead.
So that's the story behind the inspiration for my latest layout. Its the fist one I've done entirely about me, and not a particular event.
*Iced Cap - short for Iced Cappuccino. One of Tim Horton's better selections; -20 degrees Celsius
Happy Scrapping ♥
Thursday, January 10, 2008
Even more stuff!
Lots of great new stuff in the Shoppe!
I'm getting organized now, so expect more to come. Happy scrapping ♥
Edit: The shoppe is acting up right now, so all my display images looks the same. They're not, I swear. There are different products. I'm trying to fix it, but in the meantime, bear with me please.
I'm getting organized now, so expect more to come. Happy scrapping ♥
Edit: The shoppe is acting up right now, so all my display images looks the same. They're not, I swear. There are different products. I'm trying to fix it, but in the meantime, bear with me please.
Tuesday, January 8, 2008
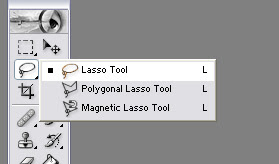
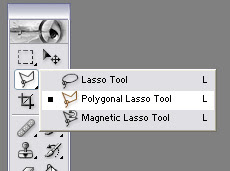
Tuesday Tutorial: Selecting
Hey everybody! How was your holidays? I hope you and your family enjoyed them as much as I did (hence the lack of tutorials). As a welcome back we're going to go over how to select things in Photoshop and I also have some new products available in the shoppe.
What you'll need:
Photoshop
A photo or image or some sort
Tools Used:
Lasso
Polygonal Lasso
Magentic Lasso
Magic Wand
Marquee's
OK, here we go,
Lasso Tool
There are three types of lasso's in Photoshop 7. The original lasso, the polygonal lasso and the magnetic lasso.
The original lasso works much like an exacto knife might. You drag it along the edge of an object until you've selected the area you want.
This can be tricky to do though, which is why I prefer the Polygonal lasso. With the polygonal lasso, you click somewhere to make a starting point and when you release, there is a line extending from where you clicked to where your cursor is moved. Click again to make a corner and go a different direction. You can even do rounded edges this way, by making lots of "starting points".
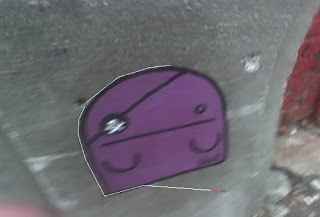
Finaly the Magnetic lasso tool will "stick" to all the pixels of a certain colour. First click to make your starting point then move your mouse around the edge of your object. When you come to a sharp corner, or if your line begins to bow in on you, simply click along the edge to make
another point.


With all three Lasso's, double click when you get back to the beginning. If you double click before this photoshop will automatically connect the start and end points with a straight line.
Magic Wand
The magic wand is one of the easiest to use and perhaps the most annoying. It will select all the pixels of a single colour (and colours very close to it) with a single click. However this does not work well with photographs or anything else with blending and subtleties to it as you are likely to end up with lots of area selected that you didn't want. To use it, you simply click on a spot that is the colour you want to select, all the pixels that Photoshop recognizes as the same or very similar in colour will be selected until another colour gets in the way.
Marquee's
Marquee's are very straightforward. You just pick the shape you want, then drag it out until the area you wish to select is contained within it. This works well when you wish to simply chop things off or select big chunks.
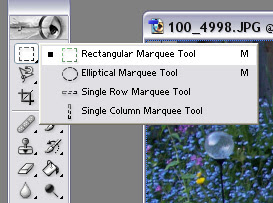
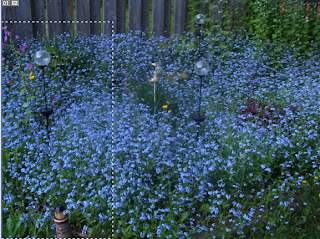
What you'll need:
Photoshop
A photo or image or some sort
Tools Used:
Lasso
Polygonal Lasso
Magentic Lasso
Magic Wand
Marquee's
OK, here we go,
Lasso Tool
There are three types of lasso's in Photoshop 7. The original lasso, the polygonal lasso and the magnetic lasso.
The original lasso works much like an exacto knife might. You drag it along the edge of an object until you've selected the area you want.


This can be tricky to do though, which is why I prefer the Polygonal lasso. With the polygonal lasso, you click somewhere to make a starting point and when you release, there is a line extending from where you clicked to where your cursor is moved. Click again to make a corner and go a different direction. You can even do rounded edges this way, by making lots of "starting points".


Finaly the Magnetic lasso tool will "stick" to all the pixels of a certain colour. First click to make your starting point then move your mouse around the edge of your object. When you come to a sharp corner, or if your line begins to bow in on you, simply click along the edge to make
another point.


With all three Lasso's, double click when you get back to the beginning. If you double click before this photoshop will automatically connect the start and end points with a straight line.
Magic Wand
The magic wand is one of the easiest to use and perhaps the most annoying. It will select all the pixels of a single colour (and colours very close to it) with a single click. However this does not work well with photographs or anything else with blending and subtleties to it as you are likely to end up with lots of area selected that you didn't want. To use it, you simply click on a spot that is the colour you want to select, all the pixels that Photoshop recognizes as the same or very similar in colour will be selected until another colour gets in the way.

Marquee's
Marquee's are very straightforward. You just pick the shape you want, then drag it out until the area you wish to select is contained within it. This works well when you wish to simply chop things off or select big chunks.


Subscribe to:
Posts (Atom)