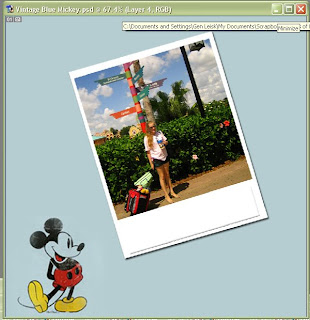
[Monday] Tutorial: The "Poloroid Effect"
So today boys and girls we're gonna learn how to make your photo's look like old school photo's. Sound like fun? Well I thought so.
What You'll Need:
Photoshop
Picture(s)
Tools Used:
Square Marquee Tool
Fill Tool (paintbucket)
Allrighty then, pens and paper ready?
- Open a new image. Mines going to be 12x12 because thats what I use for scrapbooking. I'm also going to use a paper to so I can see what Im working on better.

- Open the photo you want to work with and drag it onto your new document. I'm going to use the is picture from Coronado Springs resort in Disney World.
- I usually turn my photo so it's on a bit of an angle because it gives it a natural careless look that I think looks really good. You can do this by hovering over one of the photo's corners until you see a curved arrow with two heads. Once you see that you can click and drag your photo in the direction you want to turn it.
- Next go to your layers pallet and ctrl+click on your photo. This will produce a marquee around the photo, saving you a lot of trouble.

- Without deselecting, create a new layer (ctrl+n or file>new layer). This new layer should be the exact size and position of your photo.
- Now make click on the new layer in your layer pallet, but make sure you keep the original selected. Next get you fill tool (the paint bucket in your tools panel) and fill your selection with white (colour code ffffff).

- On the layers pallet drag the new layer down so it is listed below the original, this should put it underneath that layer.

- Now you need to drag the edges of your new white layer out to give your photo a border. Don't make it too wide, just a small one will do. It's not going to be perfect and will probably take some adjusting until you get a look that works for you.

- Now add a drop shadow and your photo is complete!
- you'll need to add a wider border at the bottom. Often this looks odd with longer or wide photo's, so if you want this look you may need to do some trimming like I did here. Ultimately you want your photo to be a little more square.

- Next add a smaller rectangle to the white space you now have at the base of your photo. Use a different colour while positioning it so you can see it better, you can change this later. Place the rectangle in the centre of the white space.

- Add a soft bevel layer>layer style>bevel emboss (Style: inner bevel; Technique: Smooth; Depth: 31; Direction: Up; Size:5)
- Fill this smaller rectangle in with white and add a drop shadow


No comments:
Post a Comment