Monday, December 24, 2007

New Product!


I'm rather proud of these. They're name tags with fun little sayings on them, you may remember a similar thing from McDonalds ads about 4 years ago. The ads showed women in T shirts that had name tags on them saying things like "Hello I'm ... Amazing" and holding salads. I really liked them and wanted a shirt like that, this is my compromise :). I hope you like them, my personal favorite is "Hello I'm ... Up Here" lol.

Tuesday, December 18, 2007

Tuesday Tutorial - Selective Desaturating

This Tuesday, we're going to go over how to make part of you photo's black and white, but keep the rest coloured or vice versa. This technique is great when you want to bring attention to a certain part of the picture only, such as the colour of something or someones eyes.

Tools Used:
Polygonal/Magnetic Lasso
Desaturation


What You'll Need:
Photoshop
Your picture


Ladies and gentlemen, start your engines...

  1. Open you photo. I'm going to use this photo of red tulips outside of my high school.
  2. Next select the area you want to remain coloured (or if there is more coloured than black and white, select the area you wish to desturate). The easiest way to do this is using the magnetic lasso tool. This will automatically "stick" to the edges of a shape based on the pixel colour. However sometimes it gets confused and can be frustrating so you may want to use the polygonal lasso.
  3. With both tools, you simply click at your starting point then guide the line around the shape. With the Polygonal lasso you will have to click again at any corners as it only does straight lines. Double click when you get back to the starting point.
  4. Create a new layer of what you have just selected. edit>copy, edit>paste or ctrl+J If you selected the area you wanted to destaurate, rather than what you wanted to keep coloured, invert you selection first. select>inverse or ctrl+shift+i)
  5. Select the original image in your layers palette and desaturate it image>adjustments>desaturate or ctrl+shift+u
  6. Last step is to merge the two layers. layer>merge visible (or merge down) or ctrl+shift+E (ctrl+E)
Perfect!

Here are some examples:


Tuesday, December 11, 2007

Tuesday Tutorial - Easy Recolouring

So for today I'm going to show you how to quickly recolour something without having to paint over it.

What you'll need:
Photoshop
Object you wish to recolour

Tools Used:
Hue/Saturation adjustment

Lets begin
  1. Open your object in photoshop. I am going to be using a paper EHI Destinations paper blue, a past Scrap Girls freebie.
  2. Open the Hue/Saturation menu image>adjustments>hue/saturation You can also do this by hitting ctrl+u
  3. Using the Hue slider, find the colour you like. The Saturation slider will adjust how much colour your adding, making it brighter as you slide it to the right and the Lightness slider will lighten or darken your image.
That's it :)

Tuesday, December 4, 2007

Tuesday Tutorial - Text with Pizzaz

This week I will be showing you how to take regular old text and make it stand out. Sure you can change the font, add some colour maybe position it better, but what about when you want to make it REALLY POP?

What you'll need:
Photoshop
clipart/picture of a small gem

Tools Used:
type
drop shadow
bevel/emboss
texture

On your marks, Set get, OG!

  1. Open a new image. Any size and background you desire.
  2. Using the type tool (T on your sidebar) create some text. I wrote Smile using the font Gigi, F71595.
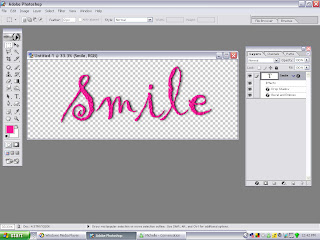
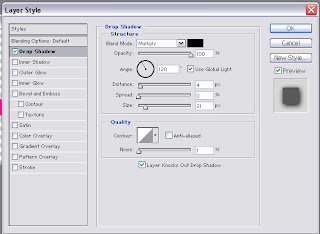
  3. Add a drop shadow. Layer>layer style>drop shadow
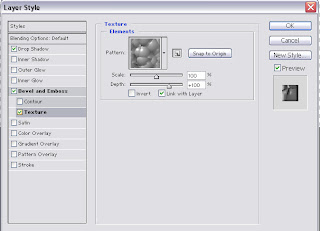
  4. Apply the Bevel/Emboss setting and texture. Layer>layer style>Bevel Emboss Layer>layer style>Bevel Emboss>Texture
  5. Open your gem picture and delete any background by using either the eraser of Magic Wand selector if it is a solid colour. I found my picture on google.
  6. Drag the image onto your image with the text.
  7. On your text image, resize and position the gem over the dot in the 'i'.
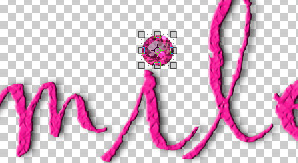
  8. Add a drop shadow to the gem. Layer>layer style>drop shadow I used the default settings.
And your done. ............................................................................................................................................................................................................................................
........................................................................................................................................................................


Friday, November 30, 2007

Scraps-of-Me Shoppe

I'm working on getting my new shop up and running. Currently everything is still free and will reamin so for some time now. Don't worry, I will give ample warning if I decide to begin charging for any of my supplies (there will always be some freebies though). It's going to be called the Scraps-of-Me Shoppe and can be found here. It may take a bit for me to get it fully up and running, but theres some stuff up there right now including a really neat scotch tape emby that cause me a bit of trouble. keep checking back for updates and enjoy :D.


Tuesday, November 27, 2007

Glitterizing

This weeks tutorial is rather short due to excessive homework. I'm going to demostrate how to make something look glittery, like with the Squiggly Tree's.

What you'll need:
Photoshop (I use 7.0)

Tools Used:
Custom Shape tool
noise filter

And we're off...

  1. Create a new transparent layer, with dimensions of your choice.
  2. Create a shape using the custom shape tool. right-click shape icon>custom shape>(shape of your choice). I used the Fleur de Lise shape and made it gold (#D5AB2C)
  3. Rasterize your new shape right-click layer>rasterize
  4. Add some noise filter>noise>add noise. You can adjust this to your liking, I used 22.3%, Gaussian. Make sure that the monochrome box is checked.
  5. All done! You can now add a drop shadow if you would like and do what you like with the finished product.

Friday, November 23, 2007

New Files

I've been busily making things (when I probably should have been doing school stuff, but ah well) and so here's a few. Let me know what you think please!

Squiggly Tree - Download Squiggly Tree.png (68kb)


Flourish Paper - Download Flourish copy.png (135.4KB) The words won't be there when it is downloaded.