Showing posts with label Photoshop. Show all posts

Tuesday, December 4, 2007

Tuesday Tutorial - Text with Pizzaz

This week I will be showing you how to take regular old text and make it stand out. Sure you can change the font, add some colour maybe position it better, but what about when you want to make it REALLY POP?

What you'll need:
Photoshop
clipart/picture of a small gem

Tools Used:
type
drop shadow
bevel/emboss
texture

On your marks, Set get, OG!

  1. Open a new image. Any size and background you desire.
  2. Using the type tool (T on your sidebar) create some text. I wrote Smile using the font Gigi, F71595.
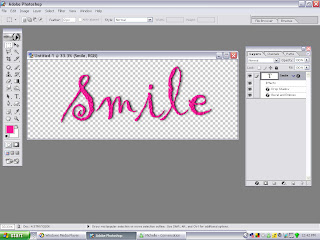
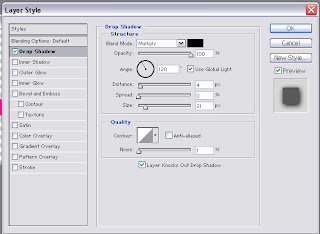
  3. Add a drop shadow. Layer>layer style>drop shadow
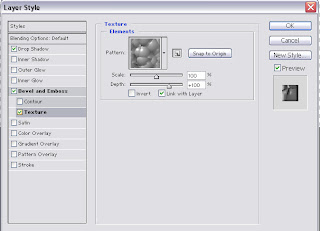
  4. Apply the Bevel/Emboss setting and texture. Layer>layer style>Bevel Emboss Layer>layer style>Bevel Emboss>Texture
  5. Open your gem picture and delete any background by using either the eraser of Magic Wand selector if it is a solid colour. I found my picture on google.
  6. Drag the image onto your image with the text.
  7. On your text image, resize and position the gem over the dot in the 'i'.
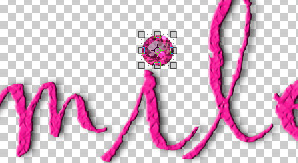
  8. Add a drop shadow to the gem. Layer>layer style>drop shadow I used the default settings.
And your done. ............................................................................................................................................................................................................................................
........................................................................................................................................................................

Tuesday, November 27, 2007

Glitterizing

This weeks tutorial is rather short due to excessive homework. I'm going to demostrate how to make something look glittery, like with the Squiggly Tree's.

What you'll need:
Photoshop (I use 7.0)

Tools Used:
Custom Shape tool
noise filter

And we're off...

  1. Create a new transparent layer, with dimensions of your choice.
  2. Create a shape using the custom shape tool. right-click shape icon>custom shape>(shape of your choice). I used the Fleur de Lise shape and made it gold (#D5AB2C)
  3. Rasterize your new shape right-click layer>rasterize
  4. Add some noise filter>noise>add noise. You can adjust this to your liking, I used 22.3%, Gaussian. Make sure that the monochrome box is checked.
  5. All done! You can now add a drop shadow if you would like and do what you like with the finished product.

Tuesday, November 20, 2007

Tutorial: Dew Effect

This weeks tutorial is how to create a dew or water droplet for a picture. Water droplets are great for close ups of flowers and plants.

What you'll need:
  • Photoshop (I use version 7.0, but others are very similar too)
  • A close-up photo of a plant, preferably a clear one.

Tools Used:
  • Layers
  • Eliptical Marquee
  • Drop Shadows
  • Filters
  • Dodge Tool
  • Gradient Tool

All set? OK, here we go:
  1. Open your image in Photoshop (I will be using this picture of a leaf from last spring) and save a COPY of it file>save as "(picture name) - dewdrop
  2. Use the Eliptical Marquee tool to create a circle. Make it whatever size you want your dewdrop to be, and don't worry, you can resize it later too.
  3. Keeping the cirlce selected make a new layer. This can be done by clicking the icon at the bottom of your "Layers Palette" (usually on the right of your work area) that looks like a page being turned. It's next to the trash can.
  4. Apply a "grey to white" gradient to this new layer (the circle) by first selecting the gradient tool from your sidebar (if you can't find it, right click the paintbucket and a smaller menu should pop out. It's there). Then click just above your circle and drag the line that appears down to just below the circle.
  5. Add a drop shadow. There are a couple of ways to do this. Layer>Layer Style>Drop Shadow or you can use the little f icon at the bottom of your Layers palette. You can fiddle around with the settings to make your shadow face where you want and be darker and such, but I set mine to: 13% Opacity, 5px Distance, 0% Spread and 5% Size.
  6. Use the Dodge tool to add a small point of reflection to your drop. The Dodge tool is located in your side bar (looks like a little pin). Just select it, then click the upper left quarter of your 'drop', make sure to leave space towards the edge though. You may need to do this a couple times to get the right look.
  7. If it is not already, add a marquee to your droplet by holding ctrl while selecting the layer from your layer palette. Add the filter Gaussian Blur. Filter>Blur>Gaussian Blur. Set the radius to 6
  8. Make sure you still have your marquee on the circle and select your original picture from the layers palette. This will give you a selection of the photo that is the exact size, shape and in the same place as your new dew drop. Now were going to warp that area so that it looks the way it might if you saw it trough a drop of water. Got to Filter>Distort>Spherize and set it to 100%.
  9. Your done! You can now move, resize and adjust your drop anyway you'd like. You can also make more droplets quickly by selecting that layer in your layers palette and pressing Ctrl and J together. This copies the layer. Copied layers are automatically named (original) copy, but you can rename them to avoid confusion by right clicking the layer in the palette and selecting properties.